Spring Cloud Config 사용하기 (Server/Client)
17 Apr 2022지난 시간에는 Spring Cloud 가 제공하는 서비스들에 대해 알아보았습니다. 이번에는 그중 첫번째로 Distributed/versioned configuration 와 관련된 Spring Cloud Config 를 알아보겠습니다.
Spring Cloud Config? 그게 뭐야?
12 factor 에 따르면 어플리케이션 설정은 환경별로 다를 수 있으며 “어플리케이션 내부에 저장하지 않는다”, “설정과 코드를 분리한다” 라고 이야기하고 있습니다.
이런 원칙을 지킬 수 있도록 Spring Cloud 에서는 Spring Cloud Config 를 제공합니다.
Spring Cloud Config의 사용 목적으로는
- 어떤 설정이 변경되었을 떄 어플리케이션 재시작 없이 동적으로 변경을 적용할 수 있습니다.
- 어플리케이션이 배포될 때 환경별로 설정값이 다를 수 있습니다. (개발환경, QA 환경, 운영환경 등) 이때, 각 환경에 맞게 설정 정보를 분리하여 관리할 수 있습니다.
- Scale out 등 동적으로 어플리케이션의 인스턴스가 증감할 때 설정 정보를 stateless 하게 유지할 수 있습니다.
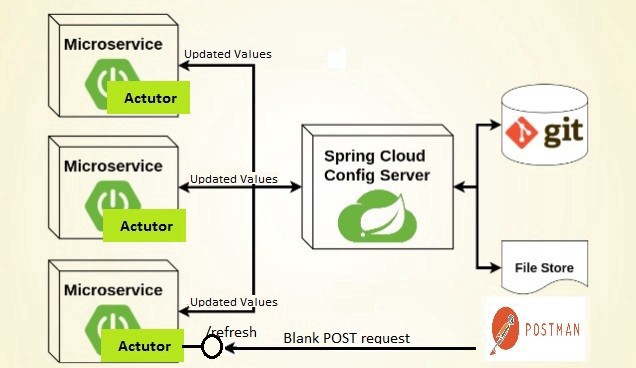
이미지(spring-cloud-config) 출처: https://jojoldu.tistory.com/509
git 혹은 file System 을 통해 관리할 수 있는 설정 파일들은 Spring Cloud Config Server 를 통해 각 마이크로서비스에 주입되며, 설정이 변경되었을 경우 각 서비스의 actuator/refresh 엔드포인트를 호출하여 config server 에서 설정을 다시 불러오도록 할 수 있습니다.
그렇다면 한번 직접 Github repository 에 설정 파일을 올려두고 Config Server 를 띄워 잘 불러오는지 만들어봅시다.
1. github repository 만들기
github 페이지를 통해 레포를 만들어줍시다. config 설정이므로 간단하게 Spring-config 로 레포명을 만들겠습니다.
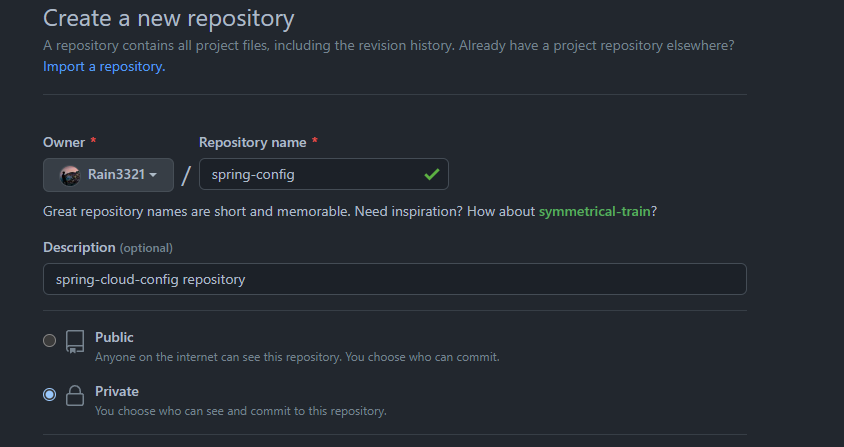
만들고 난 이후에 로컬에서 간단하게 디렉터리를 만들어 github로 push 하겠습니다. 파일시스템이나 터미널을 이용하여 직접 만드셔도 좋고 IntelliJ 를 통해 빈 프로젝트로 생성해도 좋습니다.
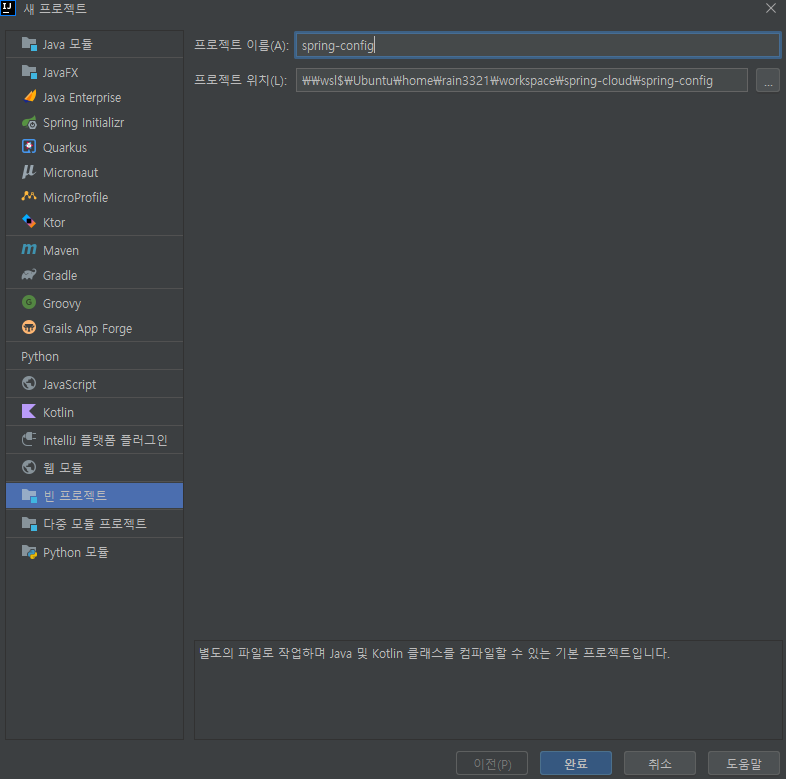
그리고 파일 하나를 생성합니다. 일반적으로 {어플리케이션 명}-{프로파일 명}.yml 로 생성하는 것이 규칙입니다.
저는 간단하게 test-dev.yml을 생성하여 다음과 같은 내용을 작성하여 github 로 업로드 하겠습니다.
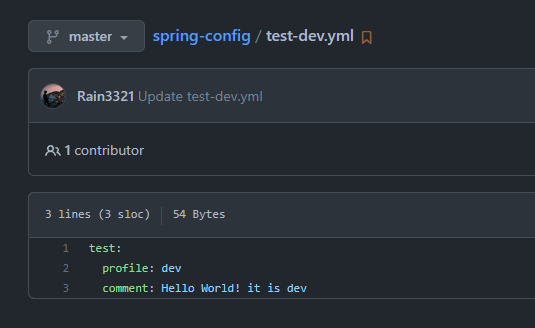
이러면 설정 파일은 모두 준비가 끝났습니다. 이제 Config server 를 세팅해봅시다.
2. Config server 설정
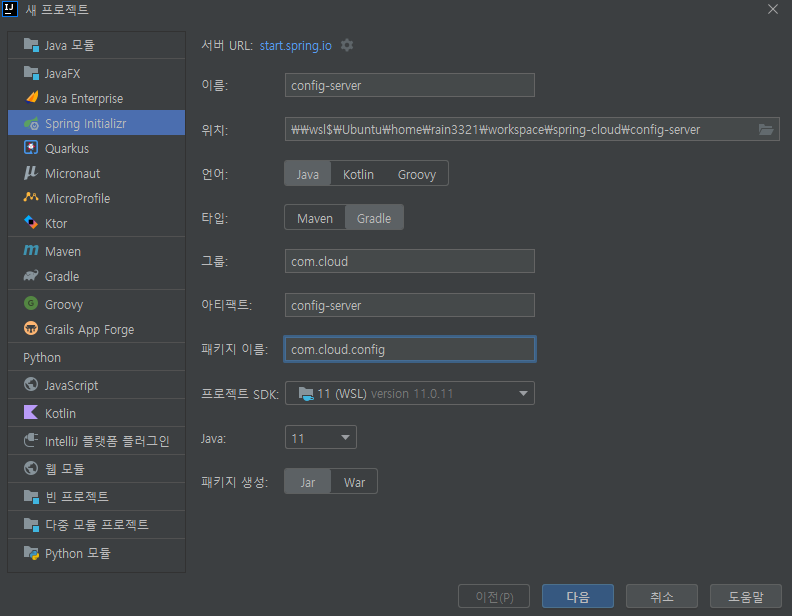
IntelliJ 로 새 프로젝트를 생성해줍니다. 프로젝트의 그룹은 com.cloud 로 두었으며 패키지는 com.cloud.config 로 설정하였습니다. 저는 maven 보다 gradle 이 익숙하기 때문에 gradle 프로젝트로 생성하였습니다.
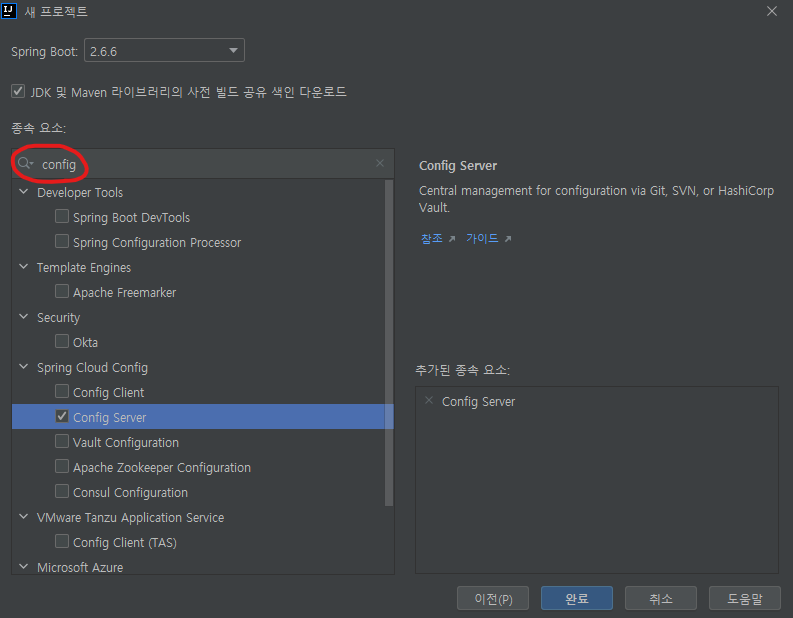
프로젝트의 dependency 에는 Config Server 를 추가해줍니다.
생성이 완료되었다면 ConfigServerApplication.java, application.yml 파일을 확인해줍니다.
ConfigServerApplication.java
@EnableConfigServer 애노테이션을 추가합니다. 이 서버가 Config Server 라는 것을 알리는 설정입니다.
package com.cloud.config;

import org.springframework.boot.SpringApplication;
import org.springframework.boot.autoconfigure.SpringBootApplication;
import org.springframework.cloud.config.server.EnableConfigServer;

@SpringBootApplication
@EnableConfigServer
public class ConfigServerApplication {

	public static void main(String[] args) {
		SpringApplication.run(ConfigServerApplication.class, args);
	}

}
application.yml
위에서 생성한 설정 정보가 담긴 repository url 을 입력해줍시다.
server:
  port: 24000

spring:
  cloud:
    config:
      server:
        git:
          uri: <github repository url>
만약 private repository 로 생성하였다면 인증정보를 추가하여야 합니다. 그 부분은 여기를 확인해주세요.
테스트
config server 를 실행시켜서 postman 을 이용해 요청을 보내보도록 하겠습니다.
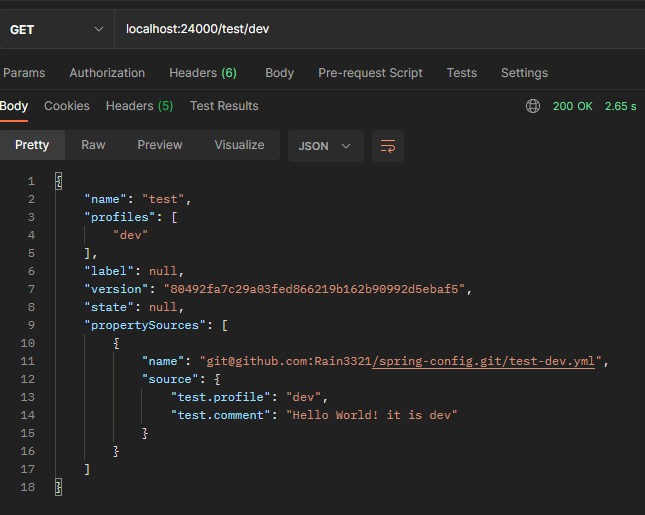
아까 설정해둔 값들이 정상적으로 넘어오는 것을 확인할 수 있습니다.
설정 우선 순위
Spring Cloud Config server 에 설정 되어 있는 파일 -> 각 인스턴스의 설정파일 순으로 덮어씌워집니다.
config server 의 경우
- application.yml
- application-name.yml (마이크로서비스의 이름을 명시)
- application-name-
.yml 순으로 적용됩니다.
그 외에
추가로 설정해주면 좋을 것들을 더 소개하겠습니다.
spring:
  cloud:
    config:
      server:
        git:
          uri: <github repository url>
          default-label: master
          search-paths:
            - '{application}'
            - '{application}/*'
default-label: 기본 git label 을 설정하는 옵션입니다. github 의 경우 default branch 가 master 에서 main 으로 변경되었기 때문에 default 는 main 으로 되어있습니다. 저는 master 가 좀더 익숙하기 때문에 설정에 추가해주었습니다.search-paths: 관리하는 마이크로 서비스가 많아질수록 config repository 도 관리하기 어려워집니다. 그래서 한 application 에 대해 디렉토리를 통해 구분할 수 있도록 path 를 추가해줍니다. 그러면 아래와 같은 구조로 구분하여 관리하기 수월해집니다.
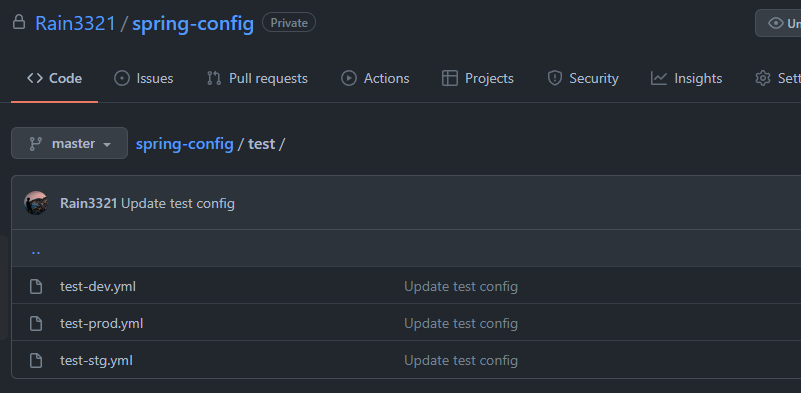
위에서부터 따라오셨다면, 현재 test 라는 어플리케이션의 dev 환경 설정이 2개가 존재할 겁니다. 한번 테스트해보도록 하겠습니다.
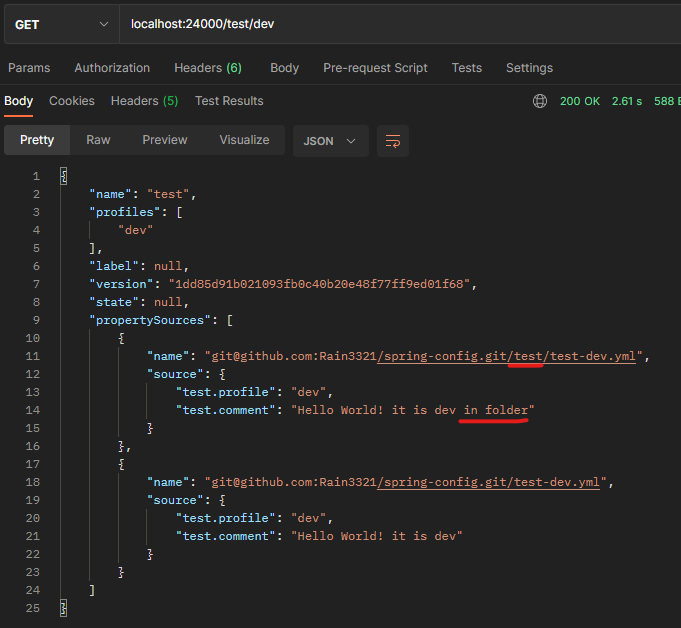
두 개의 설정 파일을 모두 읽어오는 것을 볼 수 있습니다. 여기서 궁금한게 생깁니다. 그렇다면, 이렇게 두 설정을 모두 읽어올 때 과연 클라이언트 어플리케이션은 어떤 설정을 사용할까요?
간단하게 test 라는 이름을 가진 어플리케이션을 생성하여 테스트해봅시다.
프로젝트를 생성할 때 의존성은 다음과 같이 설정해줍시다.
implementation 'org.springframework.boot:spring-boot-starter-actuator'
implementation 'org.springframework.boot:spring-boot-starter-web'
implementation 'org.springframework.cloud:spring-cloud-starter-config'
생성이 완료되었다면 application.yml 에서 config server 를 연결합니다.
server:
  port: 8000

spring:
  application:
    name: test
  config:
    import: "optional:configserver:http://localhost:24000"
참고로, config server 설정은 spring boot 2.4 이후로 변경되었으니 꼭 버전을 확인해주세요. (예시에 쓰인 버전은 2.6 입니다.)
테스트용 컨트롤러를 구현합니다.
package com.cloud.test;


import org.springframework.beans.factory.annotation.Value;
import org.springframework.web.bind.annotation.GetMapping;
import org.springframework.web.bind.annotation.RestController;

@RestController
public class TestController {

  @Value("${test.comment}")
  private String testValue;

  @GetMapping("/test")
  public String getTestValue() {
    return testValue;
  }
}
IntelliJ 에서 실행할때는 항상 profile 을 설정해줍니다. 오른쪽 위에 어플리케이션 구성 편집을 눌러 주세요.

그 이후에 활성화된 프로파일 에서 우리가 설정한 dev 프로파일로 변경해주고 실행합니다.
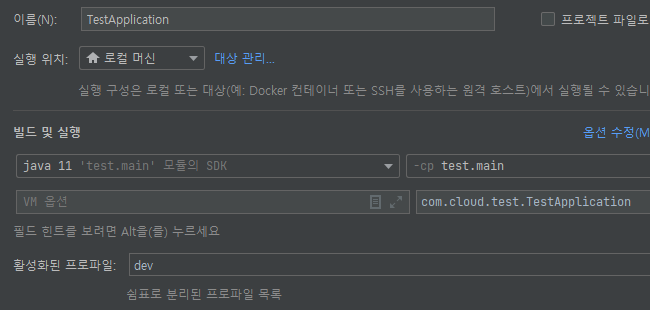
서버가 기동되면 spring boot banner 가 표시되고 이어서 config server 로부터 fetch 해옵니다.
2022-04-17 23:10:46.684  INFO 3773 --- [           main] com.cloud.test.TestApplication           : Starting TestApplication using Java 11.0.13 on rain with PID 3773 (/home/rain3321/workspace/spring-cloud/test/build/classes/java/main started by rain3321 in /home/rain3321/workspace/spring-cloud/test)
2022-04-17 23:10:46.686  INFO 3773 --- [           main] com.cloud.test.TestApplication           : The following 1 profile is active: "dev"
2022-04-17 23:10:46.705  INFO 3773 --- [           main] o.s.b.context.config.ConfigDataLoader    : Fetching config from server at : http://localhost:24000
2022-04-17 23:10:46.706  INFO 3773 --- [           main] o.s.b.context.config.ConfigDataLoader    : Located environment: name=test, profiles=[dev], label=null, version=1dd85d91b021093fb0c40b20e48f77ff9ed01f68, state=null
로그를 확인해보면 profile 은 dev 이며 http://localhost:24000 로부터 test 라는 이름의 dev 프로파일 설정을 불러옵니다.
그렇다면, 우리가 지정한 두개의 설정파일중 어떤것을 가져오는지 확인해보겠습니다.
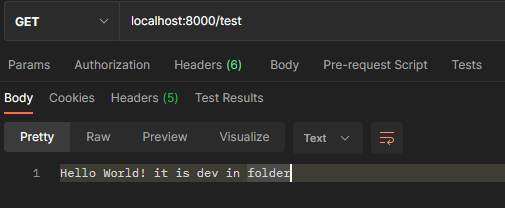
요청을 보내보면 위와 같은 응답을 볼 수 있습니다. 즉, 좀더 자세한 경로에 있는 설정 파일로 덮어씌운다는 것을 알 수 있습니다.
마치며
이상으로 spring config 에 대해 정리를 마쳤습니다. 직접 해보며 겪은 시행착오를 중심으로 작성하였으니 오류나 잘못된 내용이 있을 수 있습니다. 댓글로 알려주시면 감사하겠습니다!